Wednesday, November 24, 2010

Christmas Gatefold


I made this gatefold card for the christmas challenge on SVGCuts.com. I used their gatefold card as a base (freebie). I ran it into my Cuttlebug with the swiss dots folder, then distressed it to reveal the paper's white core. The little stars and Christmas tree sliders are from the Buckles collection.


Inside I created a little scenery of 3 gingerbread men/women enjoying a cup of hot cocoa next to the Christmas tree... ;-) It's my husband who came up with the "concept" and I thought it was a fun idea... Everything is from the "Christmas Cookie Party" collection, except the gifts I made myself (bow is from the collection), and the tree skirt doily (from the baking section...). I used foam tape of course for dimension, and bended the little arms. My favorite part has to be the little marshmallows in the hot cocoa... Yum! ;-)
My husband thinks the eyes are a little creepy but my daughter loves them!...(she and I decided against red eyes because it looked too "evil"!...;-)) The star on the tree is a brad, and I used plenty of rhinestones.


As always, clicking on the pics will give you a bigger version. It's really hard to get the dimension on a pic. I still have to figure out all the wonders of this camera... ;-)
This card will likely go to my niece for Christmas. She loves everything papercrafted, and religiously keep all the cards I send her and likes to look at them or display them. I think she'll enjoy this one too. :-D
I sure had fun making it (well, aside from cutting out those tiny marshmallows with my big hands!... ;-))

Monday, November 22, 2010

Grieving


My husband's grandmother passed away. She was a wonderful person, so kind and always seeing the good in people. I am blessed to have had her in my life. <3

To make this card I used the SVGCuts sympathy dove (freebie), and layered it (with foam tape) over the flower of life symbol. My Cricut did not like it at all, but I really love that image and to me the meaning is important because life and death go hand in hand. And the dove is a perfect symbol for a soul that has been set free...

Pumpkin window box


I made this simple little treat for Noah's teachers for Thanksgiving, using a matchbox svg files ("under cover" by My Time Made Easy) and I used the pumpkin from the SCAL library to make a cut-out and covered that window with acetate. (Yes there was also a turkey in the shape librarybut somehow I thought it might not be that appealing....;-))

Thursday, November 18, 2010

Mistletoe wreath


I love this card! Simple cards are my favorite, and the hardest ones to make in my opinion too. This one came out just as I envisionned it which is enough to make me happy! (Sometimes I have this idea in my head and can't transform it in paper!)
I made it for the Christmas Card challenge on the SVGCuts forum.

I used the wreath from "christmas cookies party" file and cut it out 3 times, assembling it with a few glue dots between the layers to slightly prop it up, and bending the leaves forward a little. My "door" is embossed with a Fiskars plate (in my cuttlebug) and I scored some panelling lines. The door handle is a brad and I cut out a little mail slot to slide a mini Christmas postcard in it...


I wrapped some cheer ribbon around my wreath to soften the overall look, made a pretty little red bow and I decided to avoid the expected red berries and go with mistletoe instead, using little pearls...


My little "Joyeux Noël" postcard slides in and out of the mailbox.

Hanukkah lever cards


Last week-end I did a workshop for an event at our synagogue. Those are the Hannukah cards I made as models.
I used SVGCuts files, (and yes it took me forever to prep everything, my Cricut was in a rebellious state of mind and I had a few issues..). I started with lever cards as a base, then used the "jewish elements" file.

I used glitter glue for the flames, if I hadn't been mass producing I would have used little rhinestones instead.
The great shiny foil I used for my candleholders, already mentioned on my blog before, is from Puff tissues boxes! :-) The menthol tissues come in a box that is silver coated inside. Almost makes you want to have a cold more often so you can scrap...

Baby bear


One of my cousins welcomed a little Heidi, and I couldn't resist making a card that showcased this fun and original name. I used a little valentine bear from SVGCuts (freebie). The DP, that I adore and have used often, is from DCWV (Nana's nursery I think). It was one of those projects that make you smile... :-)
What can I say, I love baby cards...

Warm wishes


A little get well soon card for one of my aunts who had surgery recently. I used my beloved Fluffles... ;-)

Textured wedding card


A simple wedding card for one of my cousins, that showcases the texture of the textile folder. Sorry the pic is blurry but I only uploaded it now and the card has long left! ;-)

Birthday waterfall card


I'm finally back, well my computer is, and even though it's still acting a little wonky it seems safe to try to finally update my blog!... :-)
I enlisted the help of my daughter to make this waterfall card for my mother's birthday. (don't ask how late I was... :-S) She drew the pictures for me. This sure was a fun project, and my 1st waterfall card. One I need to remember to do more often, especially for kids' birthdays! It's pretty amazing to see the pics lift up and disappear in the back, and it is deceptively simple to make!! :-D

Wednesday, November 3, 2010

Just in case you're wondering...

I am not dead and didn't give up papercrafting either.... ;-) I am just having computer problems.
My laptop crashed over 2 weeks ago and is still in repair, the hard drive died on me again, only weeks after we had to change it already! >:-(
So I have very sporadic access to internet, and no access to my SCAL. For all I know, I might have lost all my svg files! *shudders* And of course, I am not uploading pictures either...
Hopefully things will get back to normal soon, I know it's been a while since I posted anything... :-S

Saturday, October 16, 2010

Birthday Boat lever card


It's been a while since I posted anything. Time flies and I can never seem to catch up... :-(
The awful proof is this card I made for my Dad's birthday which was almost 6 weeks ago.... :-S Yes, I know, it's a shame, but I do believe in good intentions and "better late than never" so I will send it anyway...

I used the lever cards files from SVGcuts, found some cool wood grain paper (boat and left of card), and made a little marine 8 knot to reinforce my theme. My Dad isn't especially into boats, but I love them, and since I live an ocean away from my parents it seemed kind of fitting... ;-)

Wednesday, September 22, 2010

Harvest frame

Tonight marks the beginning of Sukkot, a jewish Holiday celebrating different things including the Harvest.
I made this little wreath for my friends who invited us to celebrate the 1st night of the holiday with them.
I turned it more into a frame by adding a prayer in hebrew that has to do with Sukkot in the middle (hard to see in the pic).
I used all SVGCuts.com files, except the fruits that I made myself by hand. I started with the Laurel Wreath (that I stretched to 11X11), then because it's a Harvest celebration (some people refer to it as the jewish Thanksgiving) I included details of Fall like the mums, the pumpkins, the maple and oak leaves, and the fruits at the top.


Then at the bottom are 2 things very specific to this Holiday: a lulav and an etrog. I won't go too much into details but those are things used for prayers and celebrations. The lulav is a little bunch of certains tree branches including palms and myrtle, and the etrog is a fruit from the citrus family, kind of like a giant lemon.
I used various files for my branches (including a cornstalk turned into a palm... ;-)) and made my lemon by hand.

Because I didn't know if this was gonna be hung outside (and we are in Florida so the heat and humidity are still very much here) I used a hot glue gun to attach my little decorations.
Because I turned it into a frame I didn't prop things forward too much, and just folded some of the leaves forward as much as possible.


If it didn't take me that long I would definitely make another one for my own home... ;-)
As always clicking on the pic will open larger pictures. :-)

ETA: My wreath tied for 3rd place in the challenge! :-D

Sunday, September 12, 2010

A card for the papercrafting supplies' hoarder...


Come on, admit it, I am sure there are quite a few like me around here... You buy nice embellishements or papers that you neatly put away and keep for "that special project"... ;-)
Problem is, said special project somehow never arrives... and sometimes you even forget you have all those things.... *shame* I think it's a classic newbie mistake, but sometimes it just carries on for years afterwards!... ;-D

The other day I was trying to clean up and reorganize a little bit my papercrafting supplies (I'm running out of room in my little corner there!) and I realized what a horrible hoarder I have been (and I've only started all this 3 years ago)!!
It's nothing new unfortunately, I like my beautiful Prima flowers in glass jars on my desk, I look at them and it makes me happy  *sigh* so I don't dare using lots of them... LOL

I already took the resolution a few months back to not buy any stamps till the end of the year,  but I need to be better at using my stash of paper and various embellishments before getting new ones!... so today I made a card with my hidden treasures!... ;-)
I think I've had this cool butterfly paper for over a year... The only "new" thing here are the nestabilities/shapeabilities used for the card shape and the butterflies... I used some Crayola glitter glue in place of Stickles, and I plunged right into my stash of rhinestones and brads... The butterflies are 2 layers, the one underneath being blue vellum, foam tape in the middle (one of the things I don't hoard, I go through a lot of this stuff! ;-))...

I challenge you to go through your stuff and re-discover hidden treasures and make a card with it (or several!)  The added bonus: a cleaner craft desk... And it's almost like getting new stuff since you didn't remember you had it! LOL

Monday, August 30, 2010

Autumn Squirrel


This is a card I made as my 2nd entry (1st being the strawberries) to SVGCuts August Challenge. I used Fall Pop-Up cards for the card, leaves and acorn, and used the kangaroo free file (that completes the Cuddly Animals collection) that I altered into a squirrel... :-) I think he looks a bit like a angry squirrel though, I hope he doesn't have rabies! LOL... (maybe he's just a little overprotective of his acorn, after all winter is just around the corner in some other states....;-))


For the inside I cut the word Autumn a 2nd time and glued it over. I attached a little ribbon to the T and added leaves on foam tape.


My little guy is propped on foam tape, so is the acorn (run into Cuttlebug folders) and 2 of the leaves, and his paws.

Tuesday, August 17, 2010

Laura, Piggie and Gerald...


It's my niece's birthday next Friday. Laura is turning 6 and she loves to read "Piggie and Gerald" books. Last time she came to visit us in Florida, we went to the book store together... and shortly after, those 2 (see picture below) were taking a plane to Connecticut... ;-)
So, when I made her birthday card, I just had to make a Piggie and a Gerald to go with Laura...
I used the Cricut "Everyday dolls" cartridge to make my Laura, and SVG Cuts files (Cuddly Animals part 1 and 2) for my Piggie and Gerald.
I had lots of fun, although let me tell you, inking the edges of those tiny parts and putting foam tape behind them was quite a job for my big clumsy hands... ;-)


And I realized afterwards that I should have used darker ink on my elephant since it barely shows and that the eyes should have been a tad different (forgot the eyebrows!) to look more like the comic book... but I think she'll know who those 2 are and I think she should get a kick out of it!.... ;-)

Friday, August 13, 2010

Strawberries Harvest


SVG Cuts' challenge for August has been posted and this time the requirement is to use one of their pop-up files. I know most people think Fall when they read Harvest, but I live in Florida and I am not quite ready for Fall just yet!... I decided to celebrate the sunny days of summer, and their strawberries' harvest.
My card is pretty straight forward: a lot of layering with foam tape and glue dots, a little bit of texture with embossing folders, and a tad of coloring or inking here and there...
I don't usually take my pictures in the sun, but today I thought it enhanced the summery feel of my card... ;-)

I used SVG Cuts files, the "Chamomille Friendship Cards" for the picket fence, flower pot, and bees. And the "Strawberry Lane" for the strawberries and leaves.
The inside is a Fall Pop-Up Card. I added the "berry sweet" caption and a strawberry leaf from Strawberry Lane.


I'll send this card to my sweet e-friend Bee who lives in California. She's the one who introduced me to the awesome goodness of SVGCuts.com, so I sure owe her one!! :-D
We both are nicknamed "Bee", so the 2 little bees on the card represent us... ;-)

ETA: My card tied for 2nd place in the challenge! :-D

Wednesday, August 11, 2010

In the spotlight: Mod Paperie

http://modpaperie.blogspot.com/  

If you're a familiar from my blog (are there any of you left? LOL) you might have noticed that my sidebar with all the blogs to visit disappeared. It's because it's too hard to keep up with everyone, and since my baby was born my "blog-surfing-days" are mostly over... :-S
If you were on that list it doesn't mean I don't like what you're doing anymore or anything like that!... ;-) I miss a lot of you fellow papercrafters, but there's only so many hours in a day...


Every now and then though, I run into a blog I really want to share with others, and I will keep highlighting those in my "in the spotlight" section! :-D
Today I want to tell you about Thienly's blog: Mod Paperie. She is my "SVG/S.C.A.L/Cricut Hero"! ;-D She comes up with the most beautiful projects, always using gorgeous coordinating colors and paying special attention to details, shading, depth...
Mary and Leo were right on it and made her the 1st SVG Cuts designer! :-) You can follow her papercrafting adventures on her blog and also on the svgcuts.com blog under "Thienly's spot" in the craft zone. By the way, if you haven't visited SVG Cuts' blog yet, you don't know what you're missing!... ;-)

Birthday Tiger


My niece's birthday is coming up, and I decided to finally try the cute little critters from SVG Cuts. I set my sight on the little tiger, shrunk him down to 50% so that I would still have room on the card... I used giftwrap as the background (love doing that) and for my little balloon. I forgot to run my white cardstock in my Cuttlebug before gluing my tiger together (on foam tape, of course ;-)) and I didn't like that it was flat so I enhanced it with a few polka dots of Stickles! Samantha is 4, so we needed some glitter somewhere, right!?... Especially since I already skipped the classic pink and purple tones... ;-)
I am looking forward to making the whole collection of those little cuties very soon.... ;-)

Happy 70


I made this card for my father-in-law's birthday, using giftwrap as my background, numbers from the SCAL library and a little blue bird from "Robins return" (SVG Cuts) for good luck. Added a little ribbon for visual interest, but as you can see, I am still not in my comfort zone with masculine cards! So it had to be simple! LOL... ;-)

Big bold flowers

I made those 2 cards a little while ago with some leftover cut out flowers and leaves that happened to match some leftover paper I had... ;-)
I am not completely happy with them but cannot figure out why exactly. I think probably the big scale of the flowers... Or maybe it's the prominence of the yellow, the only color I really dislike... ;-)
I embossed some of the flowers with the Cuttlebug and then highlighted some parts with a versamark pen and heat embossed with clear powder (which doesn't show on the pic, but brings a little bit of gloss on the pattern).

Tuesday, July 27, 2010

Baby brown bear


A simple baby card I made for my cousin who recently welcomed a baby girl.
It took me forever, I am beyond rusty!! The bear's nose and paws are paper pieced, and of course he is mounted on foam tape. Given the time of day I had to take my pic in the sun which obviously isn't perfect, the bear is actually brown, not greenish.... LOL ;-)

Saturday, July 24, 2010

Window garland mini tutorial

As I am trying to not buy stamps this year, I have been buying SVG files instead, LOL ;-), and also using my Cricut cartridges, like I did here since my laptop was out of commission and I couldn't access my SVG files. I made a little garland with my daughter, to decorate the vertical window panels next to my front door. It's an easy and fun way to make seasonal decorations! :-)


Supplies:
- cardstock flowers and leaves of different sizes and colors.
- ribbon (gros grain works well)
- buttons
- hot glue gun
(and ink)

Start by inking the edges of all the cut pieces. This takes a little time but gives depth.
Using the hot glue gun, attach the flowers and leaves on the ribbon, then flip your design and do the other side. This way your project will look good from inside and outside.

Finish it off with buttons in the flowers' centers.


Hang in front of the window and enjoy!... :-)
(As always, clicking on the pics will give you a larger version.)

For regular windows, I'd suggest cutting several lenghts of ribbon of different size/length and hanging them vertically in a random fashion.
I'm looking forward to making more of those with different themes like maybe Back to school, Halloween, Holidays, even birthday stuff, seasons...
As they are exposed to the sun they will fade out eventually, but they are so easy and fast to make that there should be another one ready to take its place in no time!... ;-)

[I apologize for the weird/disjointed layout but Blogger gave me a hell of a time and just didn't want to let me place my pics where I wanted... >:-(...]

Citrusy Thanks


I have been gone for so long!... I had some computer problems, my laptop crashed and the hard drive had to be replaced, but luckily we were able to retrieve my svg files and such! Phew!...

In the meantime I wasn't uploading or posting anything!... :-(
I made this card a while ago, for Catherine (http://www.thedancingpear.blogspot.com/) after winning this stamp set on her blog. :-) You might not know this but, a few months ago, I decided I wouldn't buy any stamps till the end of the year. Let's face it, I still have stamps that haven't been inked yet (shame!! but time is an issue...) and well, this little hobby of mine can be rather costly so I'm trying to be reasonnable... So it was a pleasant surprise to win some stamps... ;-)
Now this is a stamps set all about tea (created in collaboration between Catherine Doucette and Lauren Meader for My Time Made Easy), but I live in Florida and I decided to show my love for citrus and the sunshine state by using the little lemon slice and no tea themed stamp instead...

The colors on my pic are a little off, I swear it is less fluorescent in real life... ;-)

Thursday, June 17, 2010

Tickets Holder mini tutorial

I have never made a tutorial but I always enjoy seeing them on other blogs, so I thought I would take pics as I was making a little booklet to hold Naomi's tickets.
(We are starting a ticket/points system in our household to help with the concept of shores ;-) and also keep count on TV watching or wii playing.)
I thought the whole thing would be more fun with a cute little holder to keep earned tickets in! :-)

Supplies:

- strip of carstock 9 1/2" X 2 5/8"
- 3 coins envelopes no. 3 (2 1/2" X 4 1/4")
- paper trimmer/scorer
- corner rounder
- 2 magnetic strips
- 1" hole punch
- 3 tabs (I used a die by PTI to cut out mine)
- ink pad
- adhesive tape of any kind
- embellishments (& ribbon + hole punch if you wish)


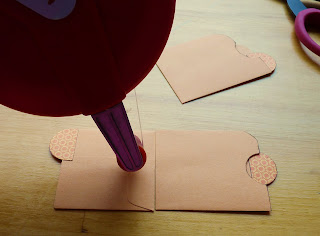
Start by cutting the envelopes' top off. The 1st one at 2 1/2, the 2nd at 2 7/8 and the 3rd at 3 2/8. Then use the 1" hole punch to make a little indentation on the front of the envelopes (for easier access to the tickets).
(Obviously this can be made to whatever size, I just left a little space between each layer. I skipped that step on the one I made for myself (see further below).)
Next add the little tabs on each pocket/envelope.

Stack the envelope on top of each other and trim the last one, then ink the edges.
That leaves you with this.

Glue the envelopes on top of each other by running 2 stripes of adhesive in the middle line of the back of each envelope and then stacking it on the next one.

Gluing only the middle part of the envelopes enables for some "accordion effect".


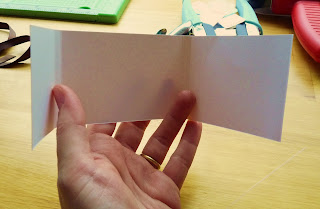
Take your cardstock strip and score at 2", 2 1/4", 6", 6 1/4". Then round the 4 corners.
Run your ink pad around the edges of the cardstock and let dry...

Glue your back envelope to the carstock.

Add the little magnetic strips facing each other. Decorate tabs if you wish.

Decorate the outside of your ticket holder.
There you have it. I don't know how to call this but let's just say a little holder for all kinds of little notes, wallet size pics and such...
Below is the one I made for myself to store the tickets I will be giving away! ;-) It's the same model, the only difference is I didn't cut "easy access half moons" and I left all the envelopes the same size... I think it looks better this way but I was looking for practicality with the 1st one... If it's gonna be handled often by a kid, they need to be able to get easily to the contents... ;-) Although the good thing it that those are so easy to make that you can just make a new one when the old one gets torn. And since the coins envelopes come in package of 250 I think I am all set for quite a while!! ;-)


I think I will make more of those to hold other little things like stamps and address labels, or the box tops I clip for the kids' schools, etc...
Well I hope my explanations were as simple as the project is. If not please let me know, I am open to constructive criticism!... ;-)
If you make your own little holders please share a link in the comment section! :-)

LinkWithin

Related Posts with Thumbnails