Monday, December 24, 2007

Merry Christmas


A Merry Christmas to you all.
May you spend a wonderful and joyful time with family. ♥


(The card is from Naomi, she made it for Lauren's daughter but we couldn't send it on time *shame*, I used my computer to erase the Alexa at the bottom of the card so that it is now for all of you here! ;-)...)

Tuesday, December 18, 2007

Candles


I finally finished my candles for Noah's teachers & therapist. Just a little something to accompany gift cards.
I know everyone here knows how to make those, but allow me to explain for my friends and family who don't have a clue!... ;-)
First you stamp (or draw) on a piece of tissue paper, then you wrap the paper around a candle and heat it up with your heating gun (a craft tool much like an hairdryer but that blows less and heat more...). The heat melts the candle which then "absorbs" the paper, leaving only a beautiful design behind.... (in theory, LOL! Sometimes the candle melts a little uneven leaving a few bumps along the way...).
The 1st pic is, obviously, of my stamped design, then it's the finished product! :-)
I hope they like it, I have no clue about what colors they like or anything....Thanks to the monogram regifting would be hard, LOL, but they can say they used it and it's burnt out and get rid of it if they find it hideous!
I like "disposable" gifts for people I don't quite know. I think the correct etiquette about that is to give something that can either be eaten or broken so that people have the option of having the gift disappear, LOL, I think this is wisdom!!! :-D
Stamps : "Boho Blossom" by My Favorite Things, "Ambassador monogram" by PaperTrey Ink, "Sewing kit" by Gel-à-tins
Ink : Brilliance Coffee bean, stamp markers

Saturday, December 15, 2007

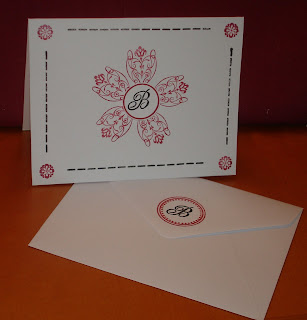
First stationery


I made this set for Naomi's teacher to accompany some Lindt Truffles.
I don't have a clue what colors she likes but since she wears a lot of black (has black hair and black eyes) I went with that and added red just to make it more cheery. I really like my flower center (flower by MFT and monogram by PTI) but am not quite happy with my border. I find it a little too empowering and think I should just have left it bare, but it's done, I made 10 of those (and had to redo one or two because of smeared ink...) and can't stomach starting all over again!.... I also worry it does look a little too handmade and imperfect for a gift... :-S ?
Since I only have 2 circle punches and needed a rather small center to not hide the flower too much I couldn't use the beautiful borders from PTI (that you can see on the enveloppe flap), so I used the "sewing kit" from Gel-à-Tin and used a button stamp just wiping clean the middle before stamping. The border is made with the sewing line in that set. And of course the monogram on the flower is on pop-dots ;-)
It is such a simple project in itself but the different steps took me forever! At the end my eyes and my wrist were killing me! Maybe I should start wearing my glasses for that type of work!
For the box, I reused a box my PaperTrey Ink stamps came in, and trimmed it to the right size and decorated it to match my stamping.

Stamps: "Boho Blossom" by My favorite Thing, "Ambassador Monogram" by PaperTrey Ink, "Sewing Kit" by Gel-à-Tins.
Inks: Brilliance Graphite Black and Pearlescent Poppy

Thursday, December 13, 2007

Ducky love


There's a story behind this cute card I made today for... my husband. Yes, I know, you thought it was for the birthday of a 5 years old but it's not....
When I showed him my new stamps the other day, we looked at the "Essential sentiments" from MFT, and I was commenting on how I might not see myself using some of them too often, like the "Hey Sexy!" one for example. I told him he was likely the only person who would ever get a card from me with that on... So that explains the sentiment...
Now, don't you love my cute little ducky? When I showed my hubby the cool set of little penguins (From C.C. Designs at All that scraps) I bought for my daughter (with the promise she would let me use them, LOL) he took a look and told me "It's cool you can even use it for ducks!" I admit I hadn't thought of that (yet!)... so that explains why there is a duck on a card for a 42 years old! LOL
I tried coloring the little guy but wasn't too happy with the result so I finally stamped him on yellow cardstock.
The heart is from "Boho Blossom" by MFT. I clear embossed the heart and the ducky and really love the glossy finish it gave them. It was a little complicated because I had already cut things out when I thought about the gloss so I had to hold Mr Ducky with tweezers by the little cowlick on his head! :-)
I wanted to sponge the borders of my green square but I forgot to do so before gluing the paper so it staid bare.... :-S The heart and the duck are on dimensionals.
As always you can see the details by clicking on the pic. (the little guy is even cuter in big size!! ;-) )
Stamps: "Essential sentiments" and "Boho Blossom" from My favorite Things, "Little penguins" by C.C. Designs.
Ink: Brilliance Graphite Black, Brilliance Pearlescent Poppy, Versamark.

Tuesday, December 11, 2007

Oh my dog!!....


I received my very 1st order from My Favorite Things! *grins*
Those of you familiar with that stamps set will likely be horrified to see that the labrador disappeared... As my husband put it, I did a "dogectomy" (please, don't throw stones at me)... I am not a dog person (I'm a cat person ;-)) and didn't feel like having the dog there.... I just wanted the seashore because living in Florida it's a must! ;-) I think I'll have some good use of this sentiment over the winter!!...
The little sticks coming out of her hat are supposed to be hair and I used the wave stamp for that... My coloring is pretty dreadful (I used watercolor pencils and regular pencils) and from the pic you can't really see but I used some Stickles here and there... The frame is on pop dots but I kept the image flat for my 1st try.
I really like my "suntiment"! ;-)
And I used my new Nestabilities (Thanks to my in-laws who gave me money for the holidays... ;-))...

Monday, December 10, 2007

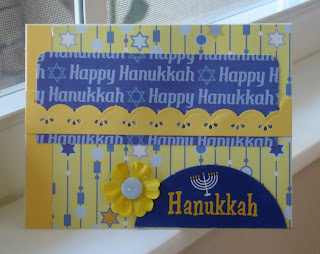
Happy Hanukkah


Hannukah is soon to be over and my Hannukah cards haven't made it to the mail box.... *shame* and I just realized I didn't even wish anyone here a Happy Hanukkah! (That's what happens when you have several blogs, you get confused on what you wrote where!...)
I don't know if any of my fellow scrap-bloggers here (or lurker-readers?) are jewish but I wish you all a very Happy Hanukkah.
May the lights of this season shine upon your life all year long.
I love this Holiday and the symbolism of light.♥
Anyway, I made those 2 cards this morning. I was thinking about a friend of mine. I never met her in real life but "know" her through e-mails, phone calls or messenger for almost 3 years now (waow, time really flies!!) She has an autistic son too and when my son was about to be diagnosed I turned to an online french community and started looking for answers, that's where I "met" her. She lives in NY state and has no family around and I thought that a little holiday cheer couldn't hurt. :-)
Those are 2 "spur of the moment" cards. For the 1st one I had this idea of the frame with the saying on the paper peeking through so I went with that and the second one actually was born from a piece of yellow cardstock I fell upon, where I had tried my scallop punch (the Martha Stewart one that looks like lace) and from the spool of ribbon I had just finished with the 1st card (the cardstock semi-circle down there is the spool side).
I'm sure by now you have guessed I don't own any Hannukah stamps... ;-)
Now I better write those cards and get them to the mailbox!


Saturday, December 8, 2007

Baby girl 2


After my fiasco with Lauren's sketch challenge (the card ended up in the trash...) I had to make another one because we need to send those baby gifts out.
By then I was even more tired and really not in the mood anymore! Plus a big bad migraine has taken possesion of my head. :-(
So I whipped up this one in 5 minutes top! Honestly it's not out of this world, but it's not my worse card either and sometimes I wonder why I spend so much time on something for a result that isn't better looking anyway!???....
(P.S: The weird looking little thing at the bottom is a little safety pin...)

Baby girl


I wanted to try Lauren's sketch challenge from this morning, but for whatever reason my card got derailed in another direction...then I tried again and the result is...blah...
And actually when I was moving it around to try to get some kind of correct lighting I made the glitter pen and ink smear all over so it ended up in the trash! :-(
I needed 2 cards to accompany gifts for baby-girls (just what I needed in the midst of my holiday breakdown!!) so I think not having the liberty of chosing the theme or the stamp blocked my inspiration!!
My camera is acting up big time, shutting off by itself whenever it feels like it...which of course didn't help with my mood.
I am tired and sick (sore throat), I haven't been sleeping well for a couple of nights because I couldn't swallow or woke up choking, so I'll just blame my current state for my blah-ness!... :-)I guess you can't always be happy with your work, or can you?

Thursday, December 6, 2007

Lost in scrapbooking


No, I am not dead and haven't been abducted by aliens...
I am just busy. I don't know where the time goes but this is a disaster!!!

I have been working on little (accordion) scrapbooks-in-a-box for gifts this year and it's taking me forever, argghhh...
It seems I always have more on my plate than I can chew...
I don't think I'll make those next year!!! :-)

Wednesday, November 21, 2007

Happy Thanksgiving!


This year I am especially thankful for all the wonderful people and fellow crafters I met over the internet. You guys are fun and inspirational in a lot of ways...
I am also thankful to have "found myself" through this new hobby of mine. 6 months ago I had no clue I could make cards and just play with paper & colors the way I enjoy doing it now.
This has been a new creative outlet for me and it feels really good!
Also I started my personal blog almost a year ago and have really enjoyed writing (it was always one of my favorite things), I have "met" some pretty awesome people along the way.
So Thank God for a year of self discovery and for bringing those lights into my life.♥
Happy Thanksgiving everyone!
PS: For this card, it was the 1st time I was using my watercolors in 10 or 15 years and, boy am I rusted!!! I used to watercolor a little when I was (way!) younger and I think it's time to get back to it! I hope that with some practice it will come back to me!! :-)

Tuesday, November 20, 2007

Gift-card wallets


Following (somewhat) Lauren's directions (that can be found here : http://laurenm.blogs.splitcoaststampers.com/2007/11/17/gift-card-holder-wallet/) I made an attempt at tiny gift-card holders...
I changed it slightly to my liking, gluing the pocket the opposite way so that the gift-card cannot get out of the pocket and making the bottom fold less wide.
The little decorative band inside is there to protect the fingers from the back of my eyelets which turned out to be pretty sharp...

I think I'll use those for my son's teachers. I love that thin cardstock from Cosmo Crickett and it is double sided, so perfect ;-) ...

Monday, November 19, 2007

So you don't have Copic markers either?....


I have been envious of those famous markers when I see the great colorings Lauren does with them... :-P but at $4 a piece I think it will have to wait ....
In the meantime I'm making the best of my Roseart kiddie markers....
So I bought watercolor paper, since I used to do watercolor a little when I was young(er) and I wanted to give it a try with some stamps... also I thought it would be a good medium for the regular markers since it is more absorbent, and would allow me to go back on the same spot several time.

I also finally invested in quality ink and OMG what a difference it makes!!... I bought Brilliance in Graphite black and I LOVE it!
So I stamped on the watercolor paper and colored with my kiddie markers, using different shades of the same color together or going over several time with the same color to make some shading. Of course this option doesn't allow any play with very light colors since there just isn't light colors in kids markers! ;-)

It's not Copic results, (and I managed to make the bee's stripes bleed... LOL) but you'll see on the flowers that you can achieve decent results without the expensive stuff (for now!!!! ;-)).
Of course it looks much better IRL because it isn't so flat and dull as in my pics.
(As always clicking on the pic gives you a giant version).

Teacher's b-day


Tomorrow is Naomi's teacher's birthday.
I don't know if she'll like it but this gift sure is unique!
Naomi drew a picture on tissue paper and I melted it in the candle with my heating tool...
The candle is not too big so it won't last forever! LOL....

Monday, November 12, 2007

Holiday pressure

The older I get, the more stressful I find the holiday period. :-(
Especially now that my kids are in school, trying to find gifts ideas for everyone and get them on time puts me on edge.
It is a cultural thing, I don't think we are especially selfish people in France, but we don't give gifts left and right just because it is Christmas... Maybe some chocolates here and there but that's mainly for friends and acquaintances, not so much coworkers or the doctor's office or even the teachers....

Anyway, as much as I love this tradition of giving I find it stressful for my time table and my wallet... and I am not so talented that I can get away with homemade gifts! LOL :-S...

This being said, I am working on little scrapbooks (with my kids' pics and/or their drawings) for grandparents, some also for brothers & sisters (but with their kids this time ;-)) and intend on stamping some candles to give to teachers with whatever else when I find just the right gift for them. They are very important people in our lives and I'd like to show them my appreciation (without going into debt or embarrassing them!).

This morning I tried my very first stamped candle and it went OK, I needed to try out the technique with the tissue paper, it is pretty cool indeed!...

Yesterday I made this origami box for my daughter with some beautiful cosmo crickett paper.
My husband bought an origami book a long time ago and it never occured to stupid me, when I started paper crafting a few months ago, to look into that book! *facepalm*
Anyway now I have (looked in the book)....and it is is pretty awesome!.. ;-)

ETA: I just found a tutorial for the box on SCS, for those who don't have a book... : http://www.splitcoaststampers.com/resources/tutorials/origami_box/

Thursday, November 1, 2007

Congrats pregnancy

Babies, babies everywhere!...
I made this card for a relative who's pregnant and I don't know the sex of the baby, so I got this idea of playing with both genders' colors and the sliders popped right into my mind with those cool ribbons... I hope she won't think I misunderstood that she was expecting twins! :-)
I am in a brown period lately... I find it very soothing. :-)
I initially wanted to use blue & pink papers instead of the buttercream in the background but I thought it was maybe too much and it is softer that way...
For the sentiment I heat embossed with white and blue powder, hoping maybe they would melt together but they didn't and the blue staid as sprinkles in the white which is a cool effect anyway! ;-) I only have one "congratulations" stamp so I used what I have, but it would have been so much better with a smaller sentiment to balance the card out... :-(
The babies are on dimensionals, so is the sentiment.
After I was done I thought something was still missing so I added a little flower (everybody loves flowers right?). Then later on, I looked at it again and thought there was still something missing so I added a second half flower and a little leaf... and I was finally happy with myself. :-)It's funny how such a little difference can "do it" for me!...

Baby Cuttlebug


It seems like everyone is having babies lately...

This is another Cuttlebug card, so cool not to stamp anything sometimes!! ;-)
I can't wait for the Polka dots embossing folder to come out! :-P I had to settle down for the swirls for now! ;-) ...

Holidays


Found this kit of pattern papers at Oriental Trading. It does make the job quite easy!... :-) Of course I added some Stickles here and there... ;-)
I said I wouldn't make holiday cards this year but I figured I might need a few to put in gift packages...

Friday, October 26, 2007

Piggy Bank

I found this little white piggy bank at Target in the $1 bin...

So I took him home and gave him a little makeover with my permanent markers... :-)

Thursday, October 25, 2007

Cuttlebug card


My point with this card was to make a card using only my Cuttlebug (well almost, since I also used a ribbon and 2 eyelets ;-)), no stamp, no coloring, just cut and/or embossed paper.

It came out Ok, I really like that color combo. If only I hadn't been experimenting with glue again and ruining the sheen of my ribbon in the process (maybe it will be less obvious once it's totally dry)... I should have known better! *facepalm*

Naomi's card


Naomi started making cards with me, a thing I am delighted about. She really surprised me taking my stamps and doing her little business.

She made this drawing for her aunt's birthday and she actually got the idea of stamping the happy birthday like a rainbow all by herself. That's where I see she pays attention to what I am doing because she did breathe over the stamp before stamping to revive the colors! :-)

Tuesday, October 23, 2007

Lizzie Anne Contest


I told you a few posts ago, about the Lizzie Anne contest.

I don't own any Lizzie Anne stamps (yet, LOL!) and it was the only requirement of the contest. The cards will be donated to Cards for Cancer afterwards.
So Lauren very kindly offered to send me some stamped images of my choice... They arrived yesterday and my card was in the mail this morning. Phew, now that was some deadline!! I hope my card makes it on time!....

I already told you I don't make holiday cards (yet) so I wanted to make one for a change...
I had the vision in my head, so when the images arrived I went right to work. And I already had my background ready, (thanks to playing with my Cuttlebug the day before...).I cut the window (that was the hardest part!!) with my X-acto blade to show the blue paper behind where I drew snowflakes with my watercolor pencil, and I added this tiny little snowman in the low corner... Of course the window is popped on double-sided foam tape, which you can't see from my lousy pic....
The big snowman is also on foam. I didn't have colored Stickles so I decided to use my daughter's 3D glue pens. What a sticky mess, the mittens took forever to dry!! :-S Looks like there is a reason why they make adult versions of that stuff!! LOL
I used gold glitter glue to stiffen the little thread that was holding my mittens so that they don't fall on each other (and stick to each other!).
As usual by clicking on the pic you get a huge version that will enable you to see details if you wish...
I kind of like the result, even though it is a "childish" card (but winter holidays are all about childhood memories for me), but given the time it took (2 hours?) I am nowhere near starting to make that kind of cards in a mass production! Or I would have to start January 1st to have them ready for the following December... I keep telling myself that once I am more experienced I will work faster but so far I am a slow learner! LOL!
ETA: I just checked the winners'cards on Lizzie Anne website... Waow!!!
There was obviously no way I could have been up there but it was a fun experience all the same!... ;-)

Monday, October 22, 2007

Best recycling ever!!!


Ok, you are gonna love this!
Since I started scrapbooking I have been paying (even!) more attention than ever to tissues boxes. I always tried to buy somewhat nice ones anyway but now I actually keep the empty boxes just in case I could do something with the cardboard.
Recently Puffs came out with a new tissue that is Vicks (Menthol & Camphor) scented.
They remind me some great Kleenex tissues we have in France (they're green and strongly scented with Menthol and Eucalyptus!) so I bought a box last time I had a cold...

When the box was empty I checked it out and was delighted to discover that the inside looks like foil. So of course I put it away for a project... :-)
Yesterday I had insomnia (Dr Pepper in the evening does this to me...) and I decided to play with my new toy (Cuttlebug) to lull me back to sleep....
The pics you see right there are the result of embossing or die cutting the tissue box. Pretty cool huh? At the left is the empty box to help you spot it on the shelf of your supermarket ;-)...
I was so happy with my find that I am almost looking forward to my next cold!! (I said almost...)
I just love it when you can recycle something and turn the ordinary into extraordinary!!

What do you think?

O.M.G I have a Cuttlebug! :-)

My husband is the coolest.... After work yesterday (yes, Sunday) he made a detour to the closest Michaels store because he saw an add with the Cuttlebug on sale and he knew I wanted one as holiday gift...
Turns out this week all Cuttlebug's stuff (as well as Sizzix and Cricut) is on sale 30% off.
So you can't use your Michaels coupon but if you buy more than one thing you really get a great deal right there. Especially since the alphabets cost as much as the machine itself (ouch).
I checked internet and you can find the Cuttlebug for less but then with the shipping it comes to the same or even more...

A few months ago I didn't even know those little machines existed and now I'm like I absolutely need one!!! LOL
At 1st I thought "what would I do with a die cut machine?" Even though I like using the one at my daughter's school when I volunteer there... :-)
What convinced me was the embossing folders. I just LOVE embossed paper, it's one of the most beautiful thing for me, so after trying templates that take forever to rub in I was attracted by the bug..... The great thing also is that you can use the kids' die cuts from the new cuttlekids in the Cuttlebug! So my daughter -who's 6 1/2 and just LOVES all that scrapbooking business ;-)- will be able to use it with me, which was a big selling point for me....

Did I mention how happy I am right now with my little gadget?.... :-D

Sunday, October 21, 2007

Trip down memory lane, bath towels and baby blankets...


So I was on Lauren's blog (http://laurenm.blogs.splitcoaststampers.com/), it's the 1st one I visit, almost every day, she is wonderfully inspiring in many ways :-). If you never visited her blog, hop over there, you'll thank me later!
She had posted this beautiful baby frame she just made for her friend and asked what was the most original baby gift we had done.

My 1st thought was "huh, I am not original in my baby gifts..." and since I only just started making cards and such....but then all of a sudden I remembered!!!

I remembered my sewing projects! :-) I made those as baby gifts for my (twins) niece & nephew, then did it again for my niece on the other side of the family.
So I went to fish the pics in my sewing box and scanned them. I didn't have a digital at the time and the picture are not wonderful but it still helps getting a better idea of the end product!....


That was quite an adventure and I'm not sure I knew what I was getting into when I started this!! The sure thing is that when I was done I swore I wouldn't do it again! LOL
It wa hard work and took me forever and I thought it would end up in the trash more than once! The bath towels especially were a nightmare because of the tiny details and the bulk of the fabric.
For the bath towels I bought matching bath towels and handtowels from Martha Stewart (quality plush for the bottoms of my nephew and nieces! ;-)) and I made the hood from the hand towel. It was easier than starting from scratch and I was sure the towel wouldn't fray afterward.
Then I made little animals faces on the towels, a cat and a dog for the twins, a frog for my other niece. Too bad I don't have a picture of the frog, I really liked it! :-( ...
For the baby blankets I did the same thing than done before for my own kids.
I bought cute matching fabrics and white fleece and sandwiched the fleece between the fabric. Then I sewn little random patterns on the fabric so that everything would stay together after it was washed. For the twins I put their initial also. For my niece I didn't even know if it was a boy or girl at the time I bought the fabric so I went with neutrals (gingham with little embroidered dragonflies), and with the leftover fabric I made a little bag holder for plastic bags. Those are really convenient next to the changing table, and pretty easy to make, it's just a tube with elastics at both ends (and a little pocket or 2 just for the fun...). I sure used mine a lot!


Thinking about all that, I remembered I did those blankets for both my babies, and my little guy still likes to snuggle with it at night (it was a baby snoopy fabric). And I also made matching changing table covers, little pillow cases for the little pillow on the changing table.
I even made curtains to block out the light in their room (of course they were not cut straight! LOL) a padded blanket for the baby carriage, a matching padded belt : → in France you can strap the carriage (whitout the wheels obviously) on your backseat using the safetybelt buckles, and the baby has a large padded velcroed belt around his/her belly that's buckled in the sides of the carriage. That allows the baby to be completely flat, like in a crib. I'm sure this would never be allowed in the US!... ;-). And I even made little door holders (with the blankets' fabric's leftovers) so that they can't slam the door and pinch their fingers in there (from a Martha Stewart project)...

So, this made me realize that I made quite some stuff for my babies (and others!), and it made me all happy and proud! *pat on the back*
And it's good because I needed a little mood lift today. ;-)

Saturday, October 20, 2007

Fluffles is back...


Ok I couldn't stay very long without putting Stickles on something so I got my dear Fluffles out so I could make the flowers sparkly... I stamped my image in brown which I think gives a softer feel than black, and it goes with my ribbon better ;-) ...
Of course the Stickles made the bee's wings smear... :-( I really need to get permanent ink!!
If you read this, please feel free to tell me which one you use! ;-)...
I am really confused by all the different kind of inks on the market!!! :-S
I made the card for a friend of mine who had surgery a couple of weeks ago and is still pretty tired. I thought Fluffles might cheer her up. That's why I went with the polka dots paper also, I thought it was happy paper....I think I will stamp some kind of sentiment inside maybe...
I didn't have any Prima so I made a flower myself with white carstock and paper and Stickles (what else!?;-)) but I would have loved to use a little sunflower, it would have been cute, or even a brown Prima would have been nice there....
Believe it or not, I haven't bought any of those yet! :-P

Coloring


Not much to say about this super simple card, I was in the mood for some coloring (with regular colored pencils, since this ink would run with the watercolor ones...)...
I admit the coloring is a bit "childish" but I don't own minerals to blend it all. I hope one day I can splurge on copic markers but they are really too expensive! :-(... I really like the effect they give!
I like the distressed look of the sentiment done by rubbing against the ink pad (yep it's a new cool thing to me ! ;-)) and I went through the troubles of coloring the stamp with my stamps markers so that each element had the color I wanted. I really like that effect, opposed to stamping a monochromatic image. I think it looks more alive that way.
The colors I used for the background were matching a pattern paper I finally decided not to use, oh well!... :-) I like brown lately, it must be the season...
And I resisted the urge to put Stickles all over!... ;-) (it's still itching me though! LOL Especially since it looks even more dull on a picture)

Thursday, October 18, 2007

Birthday pocket


Another double pocket. This one involved a lot more layering since the paper wasn't double-sided and I think I didn't use the right glue for the task... it is so much simpler with double sided paper. In the end there was so much glue smears on my workstation that I had to put paper on the back of the card too.
I like that funky-disco paper with lots of overlapping circles, the yellow circle next to the happy birthday is part of the paper print actually...
The colors are off on the 1st pic but I still haven't figure out how to adjust that on my camera...
I am having a crappy day and things really aren't going my way, it seems to me that I should probably avoid doing anything crafty on days like that. The inspiration just isn't there and I don't have the patience to deal with things not going according to my mental plan! :-( But I wanted the card to be mailed tomorrow so...

Thursday, October 11, 2007

Brown medallions card


I made this card today for my aunt (who's also my Godmother) who just turned 60.
It is belated but better late than never, right?...

I love this stamp set and I think it works very well with heat embossing.
I used copper brown powder, I wish it looked a little more brown and a little less copper but I like the monochromatic result.

Wednesday, October 10, 2007

Update on cards for the troops.

I'm happy to report that the donation box at the local scrapbook store on WCMD brought us 80 cards to send to the troops (7 of which are mine).
It feels good to be a part of this and help people stay in touch with each other at tough times.
I've always loved writing and receiving letters, and I love the idea of being sort of a messenger for someone else's words to their loved one. What could be better than that?... :-)

Somebody told me I should enroll in the RAK (Random Act of Kindness) group at Splitcoaststampers. I'd love to do that but I'm afraid it would be time consuming and I (unfortunately) don't do well with deadlines!! :-(
We'll have to see, tomorrow is another day!, and I try to take my days one at a time...

Tuesday, October 9, 2007

Connect


Another one for the troops. I really like the soft colors of that paper, and this stamp set is very dear to me since it was made to benefit autism research.
It finally occured to me that I could remove the runner on my table when I take pics... *duh*

Missing You


I really wanted to use navy paper today, (blue is my favorite color, in case you still haven't figured that one out... :-)) and I really love this new set of stamps called Carte Postale, which is french themed...

It's a very simple card, I just wanted to showcase my little embossed medallion...
I just wished I had different ribbons in stock...I think a blue organza ribbon would have been nice....it is a little bit plain Jane like that.
I'm sending it in the cards package for the troops, I think it would still be a nice card to send to your wife.
I wanted to make cards for kids but didn't have time :-( but I am sending my Ladybug and my Fluffles and the Flower Power, I think they're all suitable for a little girl. I don't have much for little boys, I guess I should get one of those sets with wild animals, that would be fun! :-)

Sunday, October 7, 2007

Mini recipes-book


So I just sent an e-mail to my friend asking that she doesn't visit that site for the next couple of days (I don't know if she does visit or not, but just to be sure! ;-))
I have been bad because I made the mistake of telling her I was working on a little surprise for her...that was months ago and I thought my little project would be ready in no time, but then life got in the way and also my biggest problem was that I actually had to cook/prepare some dishes just so I could take pics to make my little book!

I considered making it without pics at some point, that would have enabled me to put more recipes also, but I thought it wouldn't be as nice. Somebody suggested I just take pictures from a cookbook but that would be cheating to me...
So this project dragged on and on, even though it was fairly simple to start with, especially since I bought a themed mini-album for that purpose, I added a little rafia tie to close the album and match the rafia I put throughout the booklet.
The cat keeps on coming to try to chew on it so it is perched on top of the bookshelf till it's mailed!!
I was not teasing my internet friend on purpose but I hope I have learned a valuable lesson and will be able to keep it to myself next time I plan on making someone a little surprise!! :-S
Because once I promise someone (or myself) that I'll do something, I do! Only problem is sometimes it takes forever!! :-(

The recipes I put in there are just a few of my favorites, nothing fancy but things I really like (or grew up with) and I thought it would be fun to send some french recipe (one is actually morocan and comes from my husband's Grandma and is a family favorite) to an american girl who likes to cook!! It was actually hard to pic the recipes to start with, because I could only put like 5 of them.

Making the little book was fun though and it made me want to make a Recipes Book for my daughter one day, where I would put recipes from my Mom and my Grandmas, and then when she's grown up she would take it with her in her new household and keep the tradition alive! :-)I don't know when I'll find the time but even if it takes me years, I'll get there... ;-)

So anyway, Happy Birthday Catherine, (since it's her birthday today) and thanks for your patience!! :-) ....
P.S: Since, as always, when you click on the pics they get larger, I recommend that you do so and try some of the recipes yourself!.. ;-D

Saturday, October 6, 2007

Happy Thanksgiving! (Canada)

No I didn't completely lose it yet...but it was brought to my attention that it is Thanksgiving in Canada this week-end!

So I just wanted to wish a Happy Thanksgiving to occasional visitors from Canada!

Thursday, October 4, 2007

The first one...


OK so I was absolutely convinced this card was already on my blog, because it was my 1st experiment with pattern paper, and layering. I didn't have much of the stuff I have now but used whatever little gadgets I had, like the punches and my new embellishments like brads and Stickles! Now it makes me laugh because I put Stickles pretty much everywhere, and I see brads as a basic!! ... ;-)
So this card was kind of a big deal for me !
And it's really funny to see it again because if I was doing it know I would probably come up with something different...
Turns out I didn't put it up here because I didn't want Erika to see it in case she would wander on my blog!
You see, every Friday Erika (http://stampinmama.typepad.com/) has a "groovy give-away" and I was the very lucky winner of one of those and received a wonderful book from her! :-)
So I was waiting for the book to arrive to send my card and post it here, and then I guess I forgot and assumed it was already there at the very beginning! (probably because I posted it on SCS...)...
P.S: If you are familiar with Erika's blog and her beautiful creations, you won't be wondering why I had to use some kind of glitter on the card... ;-)

Tuesday, October 2, 2007

Double-pocket Birthday card


Following the tutorial from Beate (http://beate.blogs.splitcoaststampers.com/) I made a double pocket card for a friend's birthday.
I like how my little scallop circle is part of the design but also removable, and I really like the colors of this paper (it's a double sided paper and I didn't have to add anything on it which was cool!!).

After trying stamping my image in black and coloring it i didn't like the result, and the stickles made the ink run a little which was really ugly (for example the candle's flame). That's when I got the idea of stamping in colors instead and I really like it. I think the result is softer but also more crisp, more "fresh" in my opinion. I don't know if that makes any sense for anybody else! LOL!
So there you have it, my 1st double-pocket card, and much likely not the last one, since this was fun and I love tucking whatever in the little pockets!... :-)

Friday, September 28, 2007

Sand dollars, 1st attempt at resist


More new things for me!

This time I tried the resist technique, (and tearing paper)...
It took some experimenting, especially the resist technique...


A word of explanation for those not familiar with the stamping world/words:
I stamped the sand dollars (those cool Florida's shells) on a light blue paper, using a special ink that's slowdrying and very sticky(Versamark), then I sprinkled transparent embossing powder on it, shook off the excess, and used a heating tool (sort of a hair dryer for crafts, gets very warm but doesn't blow as much as an hair dryer ;-)). That powder then turns liquid and glossy and solidify when cooled down, giving a slight raised effect and a nice "glazed" finish. Then I took a piece of sponge (cut a piece of a (clean ;-)) kitchen sponge) and wet it lightly, then ran it on a blue ink pad and then colored my paper. Afterwards I dried my shells with a paper towel to remove the ink from them. That's what's called "resist" because the areas that were embossed first are protected and reject the color...

It was harder to see what I was doing in terms of heating up the powder, with the transparent one than with the black one, and the card actually went into a different direction than what I had initially in my mind (I was gonna use a paper with pictures of shells on it and add as an accent one embossed sand dollar on a piece of torn paper, attached with a paper clip...)
In the end the card is nothing spectacular, but I really like the soft colors, and am really happy to have learned a new technique... :-)

LinkWithin

Related Posts with Thumbnails