Thursday, July 7, 2011

"My Thoughts Exactly Thursday": Bee happy...


As I said in my previous posts about My Thoughts Exactly, there will be projects for you to see all month long! Thursday is our Design Team day, where we will take turn posting what we make with those cool stamps! :-)

Today Alyssa and Bee also have awesome projects to show you, so don't forget to pay them a little visit too! :-)

Now onto my project... Today I made an accordion card for my daughter. I think I need to stop making all those cards for her or she's going to want to leave every summer after that! ;-)
Let me tell you, this card gave me some trouble. I had a rather clear idea of what I wanted in my head but for whatever reason I couldn't turn that into reality. I had to walk away from the card, and come back to it the following day for things to fall into place!... ;-)

For this card, I decided to use the Birds & Bees set. Trees make me feel more serene, so I had to go with that image to match my "bee happy" saying...


This is my card completely opened. The gorgeous (flowers & stripes) papers are from the "Country Drive" collection from Echo Park. The medallions are made using my beloved Nestabilities... I will write my message on the big white one...


After stamping the main "BEE happy" sentiment on the front, I had the idea of making a back for my medallion and stamping something else on there so I went for "BEE-utiful"... ;-) I am one of those weird people who like things to look good from the back too... ;-) I then made a little mix and match arrangement of happy "BEE" sayings using the same set. Part of the fun of those stamps sets is that you can play along with the words and use them any way you want... ;-)


Then for a little fun I added one of the little bees on some wire... And since it's for my sweet little Mimi I also had to add Stickles to the bees' wings, and had some little rhinestones here and there... We both love everything rainbow, I think she will love those little details...

As always clicking on the pics will give you bigger versions. I hope you enjoyed today's project, don't forget to pay a little visit to Alyssa and Bee for more projects with My Thoughts Exactly stamps! :-D

Friday, July 1, 2011

My Thoughts Exactly 1st release!!! :-D


This is it!... The moment we have been waiting for... Today My Thoughts Exactly is finally launching their stamps collection and releasing their 2 very 1st sets!  :-)


This is The Birds & the Bees.


This is Under the Sea.


The stamps are acrylic photopolymer (same manufacturer as Papertrey Ink, so you know they're good! ;-)) which enables you to play around with them, like bending them like I did for this card...

The concept behind those stamps sets is a mix and match format enabling you to make all kind of funny sayings or puns. The stamps have been designed so that you can put them all together on one block and stamp in one step, or you can play around and deconstruct the sayings, use a different color for the focus word etc.... Focus words are a different size and/or font for a fun and whimsical effect. A cheat sheet with all the possible sayings is available on the site to help you jumpstart your imagination.

You can see and order the stamps here, and get more details on Alyssa's blog. 
Now a few words about my project for today... I made a card for my daughter who is vacationing in France and apparently having a "whale of a good time" so the saying was just perfect for me! ;-)  I used the Under the Sea set.


When I thought about using the little whale from lettering delights (the "Something Fishy" set again) I instantly wanted to make the words come out of the whale spout..., which is why I used blue ink to make it more like water, even though a black or grey ink might have brought more contrast.


My whale is of course on foam tape and the saying-spout isn't actually glued to the card, enabling more movement and a little bending away from the card for more dimension.
The wave is from a Cricut cartridge and the top was sanded, and the background paper is digital paper from the Splash collection by Echo Park, it was printed on tracing paper (a much cheaper alternative to vellum, for a very similar effect!... ;-)) The sun is from Lettering Delights.

I'm having lots of fun playing around with those stamps and you will see more projects with them very soon. Next Thursday I will have another project here for sure. If you missed it, my Bird card already uses My Thoughts Exactly stamps (this time the "Birds and Bees" set).

Every 1st of the month MTE will release one or two stamps sets and have a DT group post, meaning we will all post a project and take you on a mini blog hop if you like! The following Thursdays of the month the DT members will take turn posting, Alyssa will have all the details and link to all the projects every Thursday, as well as having projects of her own.

Now here is the line up of the MTE Design Team. To see all the projects for this July release, start with Alyssa's blog and you will then be linked to the following DT members in the order below...

Alyssa:                 My Thoughts Exactly
Bee:                     Dare to bee creative (<- you're here.)
Bee (Belinda):      Bee's Hive o' Drama
Jennifer:               Our change of Art
Jessica:                Crafty Rocket Science
Lenae:                 Sugar Gem
Thienly:               Mod Paperie

I hope you will enjoy seeing all the DT projects today and will be inspired to make your own projects with those wonderfully versatile stamps. :-D  If you have been following our line up from the start your next stop is Bee's blog. :-)


Wishing you all a great 4th of July week-end. :-D

Thursday, June 30, 2011

Let's play punch buggy!


A very simple (post)card I made using the cool stickers that come in the Country Drive kit from Echo Park! 
My daughter loves to play "punch buggy" with me when we are driving around, and today I saw 6 of them while I was out running errands and it made me think about her so I just had to make her this card! When I saw the car sticker in the paper kit I knew I would use it for her eventually!... ;-) I have to say I am very impressed with those stickers, they are thick and sturdy. :-) I just added a little bit of details with markers and some twine and voila!... :-D


For the back I made it look like a postcard using PTI stamps. Isn't that cute little postage stamp just adorable? I used my favorite little bee from one of my Fluffles stamps on it, the one I use to "sign" my cards on the back... ;-) For the twine I decided to make it fun and just punched 2 holes through the card and tied 2 different colors in the front and in the back.

I think she'll have a kick out of that 5mn card! :-D

Sunday, June 26, 2011

Free yourself from cartridges once and for all! :-D


                                                                CHECK IT OUT!


Wow, Lettering Delights did it again! They never stop to amaze me!
This time they are bringing new types of files to LD, and to celebrate that they are offering a crazy bundle!
Let me explain. There are now a lot of different cutting machines on the market. The monopoly of ProvoCrap is over, we have other options! Now the tricky part is that not all of those machines use the same types of files. The most common files are SVG (Scalable Vector Graphics) and that's what LD was selling up until now. However they are adapting to the market fast and just released a collection of simples shapes (meaning single layer) in other types of files to be used with different types of cutters.

Below is their comparison chart for the different types of files and different cutting machines:


To celebrate Lettering Delights style, they are offering this bundle of shapes for $49 (instead of the retail $150) for the next 2 weeks only! (till Friday July 15th if I got it right, LOL).
Now if you have bought stuff from LD before (they also sell graphics, fonts, clip-arts, doodlebats...), you know that every time they send you your invoice by e-mail there is also a 25% off coupon attached for a future purchase... They even send it to you when you're only getting freebies, just as long as it goes through your cart and the checkout process...
Now I'm sure you are following... that means that this bundle, if you apply your 25% off coupon, only costs $36.75!  That is for 50 collections, 780 files alltogether!! I think you will be impressed by the diversity. I say it's time to lose the cartridges alltogether. :-)

You can check this bundle here.

Tuesday, June 21, 2011

My Thoughts Exactly sneak peek


My Thoughts Exactly 1st stamps release will be July 1st, but Alyssa gave me the green light to share my very first project with you as a little sneak peek...
When I won Echo Park paper "Country Drive" pad and saw the little birds in there I instantly thought about pairing them with "The birds and the bees" stamps set! :-)
I used tracing paper to make a copy of the bird sticker and made my own cardstock bird, and the birdhouse is an svg from Lettering Delights. (couldn't resist adding little birds at the openings... ;-))


The little window was cut out with a Nestabilities, and the sentiment stamped on the inside of the card.

I'm sending this to my daughter Naomi who left for France today with her grandparents. She is 10 and it's the 1st time she goes on vacation without us! :-S She will be gone for 4 weeks so I plan on sending her a few cards... :-)

(As always click on the pic for a bigger version)

Sunday, June 19, 2011

Noah's Father's Day tie


Well it's Father's Day and thank you LD for saving people like me that always wait for the last minute... ;-)  (Oh and before I forget, Lettering Delights is currently having a sale: 50% off everything summer themed! :-D)

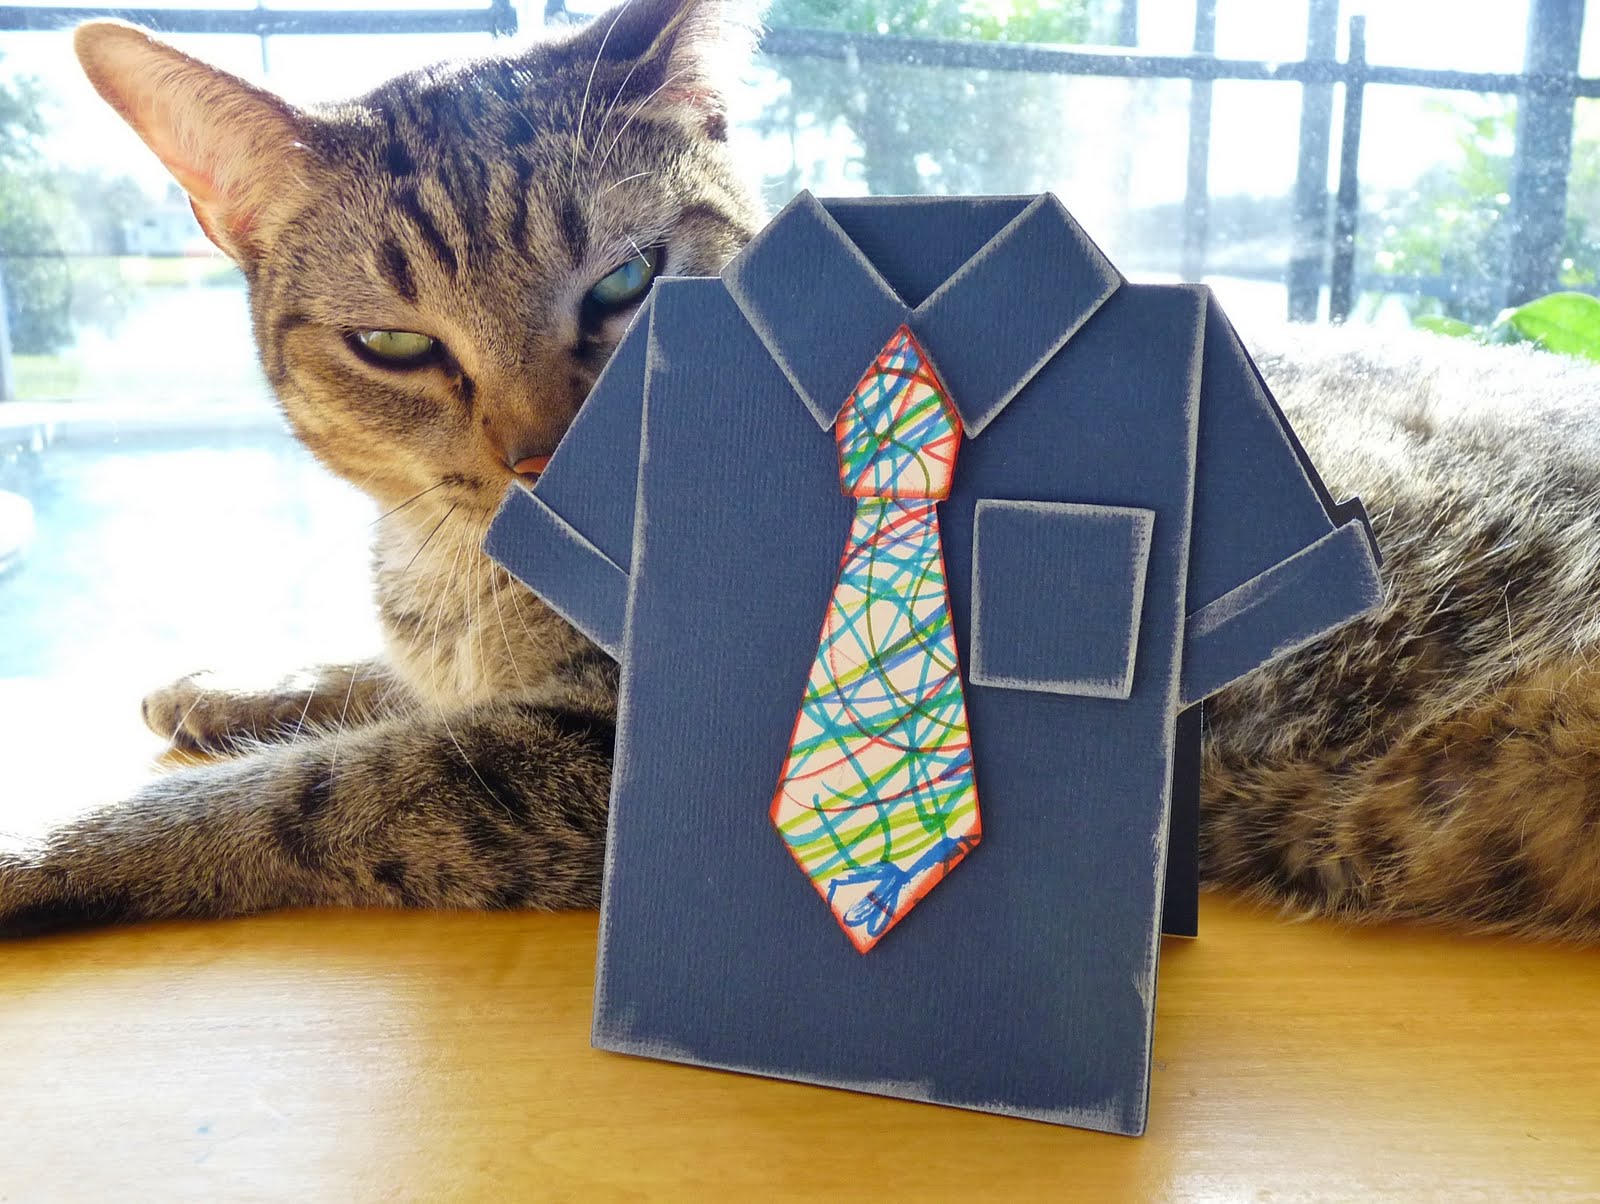
Here I used the "Dad is Tops cards and bag kit" and this was a cinch to put together. I asked my autistic son Noah to color some cardstock for me and I cut the tie from this one of a kind pattern. :-D
I used a lot of foam tape between layers but kept everything monochromatic to not take away from the tie.

We also printed the little coupon book (another great limited time freebie!) but I don't know where it is so I couldn't add it to the picture. :-) My cat however was adamant that he was not going to vacate the premises just for a silly picture, so there he is, hesitating to bite the card....


I couldn't resist and took a pic while he was yawning... Look at those teeths!! :-S

I hope you all had a great Father's day with the men in your lives. :-D

Monday, June 13, 2011

My Thoughts Exactly Design Team! :-D

Do you remember the Design Team call I was telling you about last week?
Well I'm happy to announce that I have been selected to be part of the My Thoughts Exactly design team!  :-D I am beyond thrilled and so excited!! :-D *happy dance*
Alyssa is awesome and her stamps are super cute and playful. Believe me when I tell you you'll love them as much as I do! :-D
The icing on the cake is that this team of amazing talented ladies, includes my dear friends Belinda (aka Bee, my evil twin... ;-)) and Thienly! :-D
And just so you can judge for yourself, here is the line up:

* Thienly Azim of Mod Paperie
* Lenae Gem of Sugar Gem
* Jessica Lattimer of Crafty Rocket Science
* Jennifer Rzasa of Our Change Of Art
* Belinda Brown of Bee's Hive O'Drama
* Me!! :-)

I am so looking forward to this! Thank you Alyssa for placing your trust in me! :-)

PS: If my fellow teammates stop by to say Hi, I tried to leave comments on your blogs but Blogger is still having issues and kicking me off as anonymous! >:-(

Tuesday, June 7, 2011

Nathan's first day of school...


My little guy went to school for the 1st time today. He is only 28 months old, and it broke my heart to have to let go of my baby so early. After 3 miscarriages and 3 C-sections my body is done having babies, so every little step is a last one for us, since this is our last baby!... ;-)
But no matter how much I enjoy my little Nathan's company it would be selfish to keep him home, especially since he is all over the place, throwing things in the toilets several times a day, or washing his feet in the cat's water bowl, and so forth... ;-)
Nathan seems to be a bit of a late bloomer and because his brother is autistic he has been especially on our radar. We had him evaluated, which didn't bring a definite answer, and it was highly recommended that we put him in school a little bit so that he could interact and play with kids his age.
That's basically why he is starting school this early, to socialize.
But no matter the reason, it was an emotional day for me... :-( When I came to pick him up he was sitting on the floor next to the door, sucking his thumb and with a big tear on his cheek, watching the door... The minute he saw me he got up and started crying!! And he was only there for 2 hours! LOL ;-)

Anyways, to make the transition easier, and because he seems to be quite visual, I made him a little booklet with pictures I took yesterday at his school. We looked at it yesterday night, and this morning again before going to school so that he would, hopefully, know a little better what to expect...

I used SVGCuts files to decorate the cover and a basic font in SCAL.


Inside I put pictures of the playground, the classroom, his teachers, the bathroom...


The toys, the alphabet on the wall (he is obsessed with letters and numbers!... ;-))... everything that could make this space more familiar for him, (and more loveable! ;-))


And I finished it off with numbers on the back cover (from the same SVGCuts file), just for his pleasure... :-)

I laminated everything (which is why the pictures look so weird ;-)), punched holes with my Crop-a-dile, and attached little rings and ribbons.
I think he likes it so far! (the booklet, not going to school, LOL ;-))

Friday, June 3, 2011

Purple Birthday...


No you are not dreaming, finally a card on my blog!! LOL Well, what can I say, life is crazy! I'm sure most of you can relate... ;-)
This card I made for my friend Bee's birthday is a huge card actually, since it's made of a whole 8.5X11 sheet of ivory cardstock as the base. I really like the DP I used and wanted a big background to really showcase it!  (If you want it big too, just click on the pic... ;-))
I cut-out the wings of some of the butterflies right from the paper to give them a little lift... and added one made with a die cut. I played around with transfer paper a little bit to see if it could stand up for vellum at a fraction of the cost and I have to say, it's not bad! :-)
I used a mail themed stamps set from PTI to decorate my paper further and make a mini stamp for the corner. I used as much purple as possible since it's her favorite color... ;-)


For a little bit of a surprise inside I made those buttons with a die, using one layer of DP and one layer of cardstock (cereal box! ;-)). I glued them together with my mini Xyron, perfect for that kind of project when you want glue on all the surface but don't want to use liquid glue which will make the paper warp... The colors of my pic are horrendous, I swear they're not as ugly in real life (but I cannot take another pic since I mailed them today, LOL)!.. ;-)

Thursday, June 2, 2011

School project: sorting worksheets


I know my blog has been very quiet in the creativity department lately.... but it's the end of the school year and I have lots of odds and ends to take care of... >.< I am looking forward to crafting just for pleasure again soon, but right now it's just not happening, especially with a sick toddler in my hair!!... ;-)
One of the things on my to-do list was to finish my volunteer hours for my son's school. I finally got to it and made those sorting worksheets using my Cricut cartridges Everyday dolls and Dress Up Dolls.
I've made those before for a previous classroom and they are fun to make, however they are time consuming since everything has to be laminated then cut again, then velcro added on every piece.
This time to make things a little easier I cut everything out of white cardstock and then colored the pieces with my Prismacolor markers (alcohol based markers).

It's hard to see on the pics for the categories, I did: In the kitchen/in the bathroom, for the beach/when it's raining, musical instruments/transportation, toys/food.

Sunday, May 29, 2011

In the spotlight: Under a Cherry Tree


Since I removed the blogs list from my margin, I have been trying to bring your attention to the blogs and sites that really get me excited. Under a Cherry tree is one of those...
Jin is one of those people with incredible talent and creativity, that bring inspiration and fun in your papercrafting world. :-)
Her blog is about svg files and Make the Cut software, but even if you don't use those you can still visit for eye candy!... ;-)

Thursday, May 19, 2011

Lettering Delights: May is "customer appreciation" month

Lettering Delights is dubbing may as customer appreciation's month! :-)
To kick off the celebration, you can grab American Pride Super Bundle for FREE here! (a $50 value set including clip-arts, svgs, fonts, doodlebats...)


And while you are visiting, why not take advantage of this special coupon: $5 off your order of $10 or more. Use code FiveForYou at checkout...


May I suggest the new adorable Something Fishy SVG collection?... :-)


Sunday, May 15, 2011

Father's day


I made this card for my Dad, inspired by Stamp TV's video of this week (Gina was making background paper using paper scraps and her sewing machine). I didn't use scraps but beautiful japanese paper that I cut in various width instead. I created a medallion out of balsa wood (cut and embossed with a Nestability). That inspiration came from Dawn who recently die-cut balsa with her PTI dies on her blog "my favorite things". :-D I then stamped the wood with a text background and my sentiment (both PTI).
I really love this card, the different texture of the wood is really interesting in real life. :-D

Mother's day


I made this card for my Mom using my leftover blooms from the SVGCuts challenge (I had cut extra on purpose ;-)). The background paper is japanese paper, and the flowers match perfectly (both have that cute little indentation I like so much). I like this card but there's something bugging me, I can't quite put my finger on it... I think it is probably the lack of contrast between the blooms and the background paper (although it's not as bad in real life since there is a texture difference between the 2), and maybe the fact that the dark brown branch is the only thing really contrasting? Also I think I could lose the embossed white band at the bottom, but then it would be even more monochromatic... Or maybe it's because I don't like the color combo pink + purple?...
I'm pretty sure however, that my Mom won't mind and that she will be less critical!... ;-)

Sunday, May 1, 2011

Carnet de Voyage


Naomi is turning 10 next week... and the lucky girl will go to France this summer as her gift. She will spend almost 4 weeks at her grandparents, in the suburbs of Paris. She'll go visit Paris and other parts of France, maybe even the French Riviera where she was born right before we moved back to the States... She'll get to walk to the bakery for a fresh baked baguette and eat all kind of cheeses, or go to the farmer's market and choose from an array of fresh produces. She'll get to spend time with family, meet her distant cousins... and just have a wonderful time! :-)
I am so jealous! >.<  But because I am a nice mom still, I made her a little "Travel diary" to take with her so she can write things from her trip that she wants to remember, and write her thoughts when she is homesick too... ;-)
It was the 1st time I used my Cinch and let's say I ran into a few problems... I used svg files from the SVGCuts collection "Cherry Blossom" and the freebie branch, and the Eiffel Tower is from their "Amelie's Accessories" collection. I handcut the leaves and the tag is made with a Papertrey die. I kept everything super flat, the opposite of if this was a card, so that hopefully the decorations will stay on the notebook all summer long, even with this being put in and out of a bag. I still have my doubts, but we shall see!... :-s

Tuesday, April 26, 2011

Gift cards SVGCuts' style...


First let me apologize about the crappy picture but those are on their way to school first thing tomorrow morning so I had to take my pic at dusk which is never really successful for me... ;-)

Next week is teacher's appreciation week and Naomi's room Mom wanted to present the teacher with a different giftcard everyday (ambitious project!), so I made little giftcard holders for her. I have no clue what giftcards she got, except one for a massage so I just used a little bit of everything.... ;-)
All files are from SVGCuts. The ladybug was a freebie (because yes, they're cool like that and give a lot of freebies away... ;-)) and the rest is from the "Give a gift card" collection.

My little guy has croup right now so time was of the essence and I kept them rather simple (of course I forgot to run my ladybug in the Cuttlebug before assembly...) but they can obviously be spruced up.
As usual Mary paid attention to the little details, and these are a cinch to put together! :-)

Sunday, April 24, 2011

Dare to bee Creative on Facebook.

Hi everyone! I think I forgot to mention that if any of you who follow my blog (and even the ones that don't! ;-)) have a Facebook account you can also find me there now! :-)
I recently created a page: Dare to bee creative , and my blog will now appear on it thanks to Networked blog's app. The old stuff isn't on there but the new one will.
I did post a full album of pics of my "craft corner" there, but didn't get a chance to post it here yet, I will soon for the people that are not into FB... ;-)

(There is also a FB link-button in my right margin)
Thanks for visiting me, I hope to see you soon!... :-D

Thursday, April 21, 2011

Smell the roses...


Here is my project for the "Cherry Blossom Challenge" on SVGCuts.com's forum.
I LOVE everything cherry blossom, I have fond memories of the huge cherry tree that was in my garden when I was a child... So when the challenge got posted my creative wheel started turning right away... the problem is, my mind was going in all kind of (very) different directions at the same time, and I couldn't decide on one option!...
It quickly became clear I wanted something a little different, so I thought this paper would work well with big colorful blooms. Now if you know me, you know that black & white isn't really a combo I use a lot in papercrafting. I find it too cold and strict. I tried to soften it up here by using a lot of patterns that ressemble old french wallpaper.


I made a little sheet music with stamps, and used the page of an old novel because I like text background a lot... (It cracked me up that the title was "Late Bloomer" so I just had to use it! ;-))
I tried using novel pages in my cricut to cut SVG's but it didn't go well at all! The paper got torn, even on a lower speed... :-(


I made my 3D blooms using the Sakura flower from the cherry blossom collection. I am so glad Mary included this simple flower in the collection as I really really love the little indentation on the end of the petal... It's my favorite one. :-)  They remind me of peonies this way, and peonies are my favorite flowers (with lilac blooms and cherry blossoms... ;-)) It's hard to see in the picture but I also cut the foliage twice and added leaves on pop-dots here and there to give it more dimension.


I finished it off with a little tag with a sentiment, and little pearls on the opposite corner, and hung it on the wall next to my crafting desk. Initially it was going to be a card, but as I was adding things on it it got bigger (it's 6X6), and the blooms are so full that they would be an issue to mail, so I glued it on a cereal box chipboard and made a little hanging sign instead... :-)
I love the end result and I had fun playing out of my "color comfort zone"... ;-)

ETA: My entry was 3rd in the challenge! :-D

Friday, April 15, 2011

Birthday cupcake


Another birthday card for a niece... No, I'm not losing it, I just have 2 nieces and 1 nephew who have their birthdays 3 days apart... ;-)For this one I used Lettering Delights files (Sweet Nothings SVG collection). The card folds up in a sort of frame. I held it closed with a ribbon and little medallion.


When you slide the ribbon that's the 1st layer. For the following layers I added little tags to write my sentiments and make it a little more fun...


The last layer is a little cupcake...


...complete with cherry button, felt mint leaf, and swirly Stickles frosting... Yum! :-)

My hubby thinks it's not very child friendly... I admit I have troubles with children cards, I often make them too "babyish" or too grown-up, but I think this one is fun enough for a child because of all the layers to open... ;-)

Thursday, April 14, 2011

In the spotlight: Make Something Splendid

Envelope Book by Liz Kartchner


I'm sure all of you already know Elizabeth Kartchner! :-D But you might not know that she has a new website called "Make something splendid" where you can purchase video tutorials (with or without kits to complete the projects).
I am tempted by the (soon to come) felt cupcakes!... :-P And that little Glassine Envelopes Book she made for her baby Lola is just adorable... <3
Check it out!... :-D

LinkWithin

Related Posts with Thumbnails